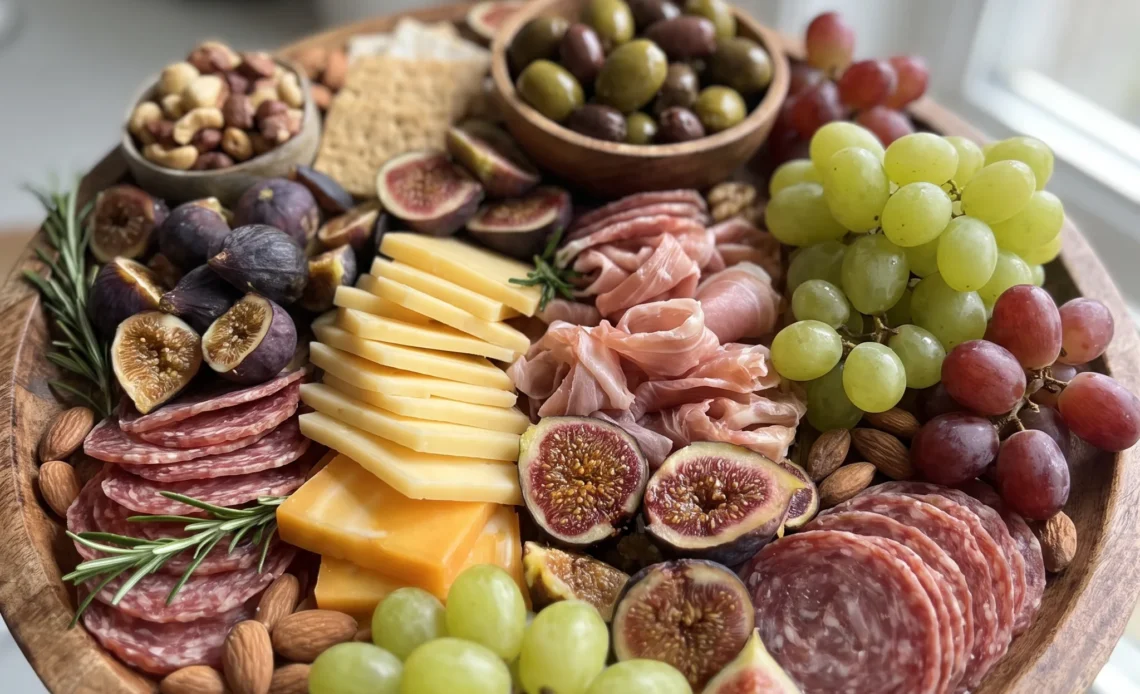
A charcuterie board isn’t cooking. It’s shopping, then placing things where they look right, and that’s where most people freeze up, because the board is unforgiving in a way a pot of soup isn’t. Nothing hides a bad decision.
Put the brie down first and you’ve committed; build outward from there and the whole thing either reads as abundance or as a pile. The charcuterie board that works is the one where nothing touches and no spot looks bare, and getting there has less to do with how much you bought than with the order you set things down. Buy good cheese in blocks, cut it yourself, and give yourself room to be wrong.
Board size and the look of plenty
A crowded board reads as less, not more. When items hide each other, the eye sees a jumble, not a spread. Each bite should be visible and within reach.
Pick a board that’s flat and has a little room to spare. A large wooden board, platter, or serving tray works.
The surface area matters more than the amount of food. A big board with a few items looks generous because there’s space between them; a small board with the same food looks cramped.
You want a little bare wood showing at the edges so the arrangement feels intentional, not stuffed. If you’re using a round platter, keep the outer ring clear.
That empty space signals abundance, not lack. The same principle applies to any serving surface: give the food room to breathe, and it will look like more than it is.
Anchor first with cheese and dips
Cheese pieces and small bowls of dip give you fixed points to build around. Without them, you’re guessing where things go and end up shuffling everything.
Place them first and you’ve got a skeleton. A bowl of honey here, a wedge of brie there, and suddenly the board has structure.
You can see where the gaps are and what needs filling. This order also saves you from having to move heavy or messy items later. Nothing is worse than arranging crackers, then realizing the dip bowl has to go in the middle and now everything’s shifted.
Work around the anchors, not the other way around. Once the big pieces are down, the rest falls into place with less fuss.
You’ll notice the board feels planned, not random.
Give meats and crackers some shape
Sliced cured meats are flat and slippery. Fold them in half or roll them into loose spirals. That simple move adds height and makes them easier to pick up.
A flat slice slides off a cracker; a folded one stays put. Do the same with crackers: stack them in small clusters rather than fanning them out.
A tight group lets a guest take a few without knocking over the whole arrangement. Breadsticks can go upright in a cup or laid in a neat pile.
You’re not just arranging, you’re making the board more functional. And the varied shapes, some tall, some flat, some rolled, keep the eye moving. The board looks fuller because there’s more to see.
That’s the result of a few folds, not more food.
Small bites fill the gaps
Once the big pieces are down, gaps will show. That’s where fresh fruit, dried fruit, olives, nuts, and other small bites come in.
They fill the empty spaces and make the board look abundant. Scatter them evenly; don’t dump all the grapes in one corner.
A few strawberries here, a cluster of olives there, some apricots tucked between cheese wedges. The mix of shapes and colors keeps things interesting.
You want each area to have something to grab, no bare patches. But don’t overfill.
If items start touching and overlapping, you’ve gone too far. The goal is a board that looks generous without feeling crowded.
Step back and see if any spot looks empty. If so, a few nuts or a slice of apple will fix it. That’s the final check before garnish.
The last touch that makes it special
A few fresh herbs, some nuts, or edible flowers scattered over the top signal that someone cared. It’s the difference between a plate of food and a spread that feels intentional. A sprig of rosemary next to the cheese, a pinch of flaky salt on the dip, a few violet petals on the fruit.
These small additions add color and freshness. But restraint matters. Too much garnish and it looks cluttered, like you’re trying too hard.
One or two accents per section is plenty. The board should still look like food, not a florist’s shop. When you step back and see a board that looks put together without looking fussy, you’ve nailed it.
That’s the moment to stop. Serve it as is, with a few small knives or spreaders, and let people dig in.

What to buy for a board that looks full without being fussy
Cheese (2 to 3 varieties): Pick one firm, one soft, one sharp if you can. That gives you different textures and colors without extra shopping.
Sliced cured meats (2 to 3 varieties): Ask for them sliced thin enough to fold but not so thin they tear when you pick them up.
Fresh fruit: Choose fruit that’s ripe but still firm. Soft berries collapse under their own weight once they’re on the board.
Dried fruit: Look for plump, bendy pieces. Hard, shriveled ones stay hard and don’t look like something you’d want to eat.
Crackers, breadsticks, or baguette: Get sturdy crackers that won’t crack under a slice of cheese. Thin, fragile ones break before they reach a plate.
Crackers and breadsticks are dry, porous starches that absorb moisture from any high-water-content item they touch, such as fresh fruit, dips, or briny extras. When those items sit in direct contact, water migrates into the starch and turns a crisp snap into a soft, stale chew within minutes. The board’s flat surface offers no barrier, so the only defense is physical separation or timing.
How to judge the board as you build it
When the anchors are placed so the board still has breathing room
Cheese and dip bowls go down first, but where you put them decides everything after. Leave at least an inch of bare wood between each anchor. If two anchors touch, you’ve already lost the space you need for meats, crackers, and fruit.
You can slide them apart now, but once small items are down, moving an anchor wrecks the arrangement. The board should look open, not half full.
How to tell if folded meats are too tight or too loose
Fold or roll each slice so it holds its shape without springing open. Too tight and it looks like a wad; too loose and it slumps flat.
The test: pick one up. It should stay folded to the touch without pinching. If it flops, fold it again.
If it’s hard to pick up because it’s so tightly packed, loosen it. A good fold makes the slice easy to grab and gives the board height.
The moment the board crosses from abundant to crowded
Step back after adding small bites. If any two items touch, you’re at the edge. When three or more pieces overlap, guests can’t see what’s there, and the board reads as a pile.
Correct by removing a few items, not rearranging. A handful of nuts or a few grapes can come off and go into a small bowl on the side.
You want gaps between clusters, not a solid carpet of food.
Deciding if the garnish adds or distracts
Herbs, nuts, or edible flowers should sit next to a cluster, not on top of it. One sprig of rosemary beside the brie, a few violet petals near the strawberries.
If a garnish hides the food or makes you look twice to identify what’s underneath, it’s too much. Remove it.
The test is whether the board still looks like food first and decoration second. If not, pull the garnish back.

Charcuterie Board with Cheese and Cured Meats
Ingredients
Method
- Choose a large wooden board, platter, or serving tray. A flat surface with a little room to spread out makes arranging everything much easier.
- Place the cheese pieces and small bowls of dip on the board first. These anchor the layout and help you plan the rest of the arrangement.
- Fold or roll the sliced meats and tuck them beside the cheese. Then place crackers and breadsticks in small clusters so guests can grab them easily.
- Add fresh fruit, dried fruit, olives, nuts, and any other small bites you like. Fill the gaps so the board looks abundant without feeling crowded.
- Tuck in fresh herbs or a few pretty accents at the end. A little garnish goes a long way in making the board feel special.
Storage and Serving: Timing, Leftovers, and the Finishing Touch
Serve this board within two hours of assembly. Cured meats and firm cheeses hold up well at room temperature, but cut fruit weeps and crackers soften as they pull moisture from the air.
The texture you built starts slipping after that. The garnish goes on last, right before serving. Herbs wilt when refrigerated, so never store the board garnished.
Leftovers keep in the fridge for up to two days, but only if you separate the components. Cheese and cured meats go in one airtight container; crackers and breadsticks in another at room temperature. Discard any cut fruit, dips, or briny extras that sat out past two hours.
Cold cheese loses its suppleness and tastes flatter, so let it sit out for 15 minutes before eating. Cold cured meats tighten and feel greasy.
Crackers stored cold go stale faster. To rebuild a smaller board, use fresh fruit and new crackers, then add the chilled meats and cheese. Eat within an hour for the best texture.
Swap the cheese, meat, and dip, but leave the crackers and fruit alone
Cheese: Any cheese that melts into a puddle at room temperature, like a soft triple-crème, will turn greasy and lose its shape on the board. For a dairy-free board, use firm plant-based cheeses that slice cleanly, such as cashew-based blocks or almond-based wheels.
Start with the same amount the recipe uses (2 to 3 varieties) and adjust after tasting. Firm cheeses hold a cut edge and let guests pick up a slice without it smearing.
If you go dairy-free, expect a slightly different texture: some plant-based cheeses are softer and may need to be served in thicker slices to stay intact.
Sliced cured meats: For a turkey or chicken option, stick with turkey salami, turkey pepperoni, or roasted chicken slices as the recipe suggests. If you want a plant-based swap, try thin slices of smoked tofu or seitan that are already seasoned. Start with the same amount the recipe uses (2 to 3 varieties) and adjust after tasting.
Plant-based meats often don’t fold as neatly and may crumble; handle them gently. The flavor will be milder, so you might want a dip with more tang, like mustard, to balance.
Dips: Honey, mustard, fruit jam, or hummus are all fair game. For a dairy-free option, hummus and mustard are already fine.
If you swap honey for maple syrup, it’s runnier and may pool on the board. Start with the same amount the recipe uses (1 to 2 dips) and adjust after tasting.
Thicker dips like hummus stay put in a small bowl. Runny ones like maple syrup can spread if the bowl tips, so use a deeper bowl or serve it in a ramekin.
The flavor change is minimal if you stick to the same category.
Crackers, breadsticks, or baguette: Leave these alone. Gluten-free crackers often lack the structural crunch and can break under a slice of cheese. If you must go gluten-free, choose sturdy ones made from rice and nut flours, and test one with a cheese slice before putting them on the board.
Use the same amount the recipe suggests. Standard crackers provide the crunch that contrasts with soft cheese and meats.
Gluten-free versions can be more fragile, so you may need to double up slices or serve them in a small bowl to prevent breakage.
Fresh fruit: Don’t swap fresh fruit for dried or canned. Fresh fruit gives juiciness that cuts through the richness of cheese and cured meats. If you can’t find a specific fruit, choose another fresh fruit that’s firm and ripe, like apple slices instead of strawberries.
Use the same amount the recipe suggests. Fresh fruit adds moisture and a burst of acidity. Dried fruit is chewier and sweeter, which changes the balance.
Canned fruit is too wet and will make the board soggy.
Tips
- Buy cheese in block form and cut it yourself. Pre-sliced cheese has more surface area exposed to air, so it dries at the edges and curls before the board even goes out. A block keeps its moisture until the moment you cut it, and you control the thickness: cut firmer cheeses like cheddar or manchego into thin planks, and softer ones like brie into thicker wedges so they hold together when guests pick them up.

Frequently Asked Questions
Can I make a charcuterie board ahead of time?
Yes, but the work you can do ahead isn’t the whole board. You can pre-fold the meats, cut the cheese, and portion the olives, nuts, and dried fruit into small containers the day before. Keep those components separate and refrigerated, then assemble within two hours of serving.
Fresh fruit should be cut close to serving so it doesn’t weep, and crackers go on last so they stay crisp. The board itself is a 15-minute job, so the real shortcut is having everything ready to place.
How do I keep crackers from getting soggy on a charcuterie board?
The moisture is coming from something wet sitting against them, usually cut fruit or a dip that’s spread too close. Leave a bare finger-width of wood between the crackers and any juicy item, and keep dips in their own small bowls.
Put crackers down after the fruit, not before, so you’re not tempted to tuck them into a damp spot. If you’re assembling more than an hour before serving, hold the crackers back and add them at the end.
Sturdy crackers help, but separation is what actually does the work.
What’s the difference between a charcuterie board and a cheese board?
A cheese board is built around the cheese, usually three to five kinds with maybe a few nuts or preserves as support. A charcuterie board, like this one, gives equal billing to sliced cured meats and includes a wider spread of fresh fruit, dried fruit, briny extras, and dips. The cheese count here is 2 to 3 varieties, not the star of the show.
In practice, the terms get used interchangeably, but if someone says charcuterie, they’re expecting meat to be a main event, not a garnish.
