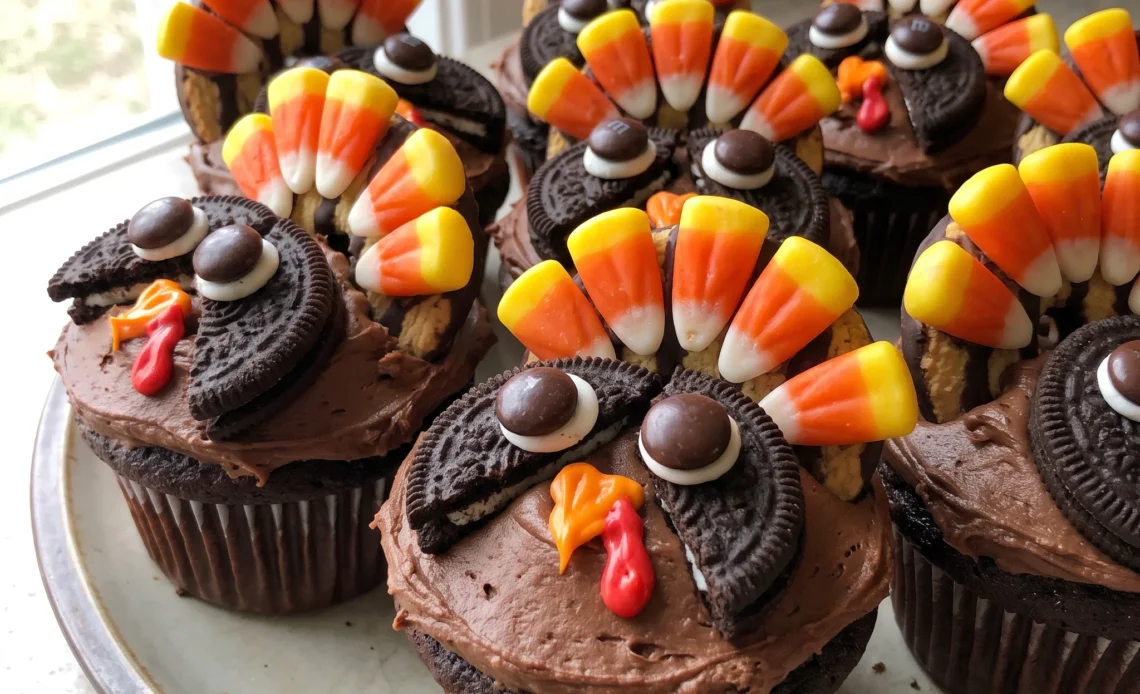
Assembling a flock of turkey cupcakes is mostly a drying problem wearing a costume. The chocolate base and the frosting are the easy part.
What trips people up is that every googly eye, pointed beak, and fanned tail is a small glued object, and glued objects need to sit still long enough to set before anything else touches them. Rush that and a candy corn heads south, an M&M slides off its cookie half, the tail cookie cracks at the insertion point.
None of it is hard. It just won’t tolerate impatience. Work through the stages in order, let each piece firm up, and the payoff is a platter that looks like it took all day.
These turkey cupcakes reward the cook who waits.
Why does the order of decorating matter?
Each decorative piece needs time to set before it can bear any weight. The candy corn features a white tip that must point inward on the fudge stripe cookie, so you first set it in place to judge the position, then lift it off and use icing as glue to secure it permanently. That brief dry run prevents a lopsided tail.
The M&M eyeball gets its own drying period on the Oreo half; if you skip that, the candy slides out of place when you attach the eye to the cupcake. The orange nose and red waddle are piped directly onto the frosting and need a short set so they don’t run into each other. Finally, the tail cookie must dry completely before you push it into the back of the cupcake, or it will crack or droop.
Building in stages lets each element firm up, so the finished turkey holds together when you serve it.
How do you get royal icing stiff enough to hold its shape?
Royal icing needs to pipe clean lines and hold a dot without spreading. Cream of tartar helps the egg whites whip to a stable foam, giving the icing structure.
If after beating the icing still feels slack and a piped test line puddles, add more powdered sugar a little at a time until it thickens. You’ll divide the icing into three bowls: one tinted orange, one red, and one left white. Gel food coloring is the right choice here because it adds intense color without thinning the icing the way liquid coloring can.
The final consistency should be thick enough to pipe through a #5 tip but still smooth enough to flow. When you squeeze, the icing should hold a bead that doesn’t flatten out. If it’s too stiff, a few drops of water will loosen it, but add sparingly.
Why whip the butter alone first?
Starting the frosting by whipping the butter by itself breaks it down and aerates it, so it blends smoothly with the other ingredients. If you dump everything in at once, you’re more likely to get lumps that never fully smooth out. Once the butter is light, add the cocoa and powdered sugar alternately with the heavy cream.
This back-and-forth keeps the mixture from becoming too dry or too wet at any point, which helps prevent clumps. You’re aiming for a frosting that’s thick enough to hold a piped swirl but still spreadable.
If it ends up too stiff, a splash of cream loosens it; if it’s too loose, a spoonful of powdered sugar tightens it. A large pastry tip gives you a wide band of frosting that covers the cupcake’s domed top in one pass and creates a stable bed for the decorations. That thick layer supports the cookie tail without sagging.
Why must the cupcakes cool completely before frosting?
After baking, the cupcakes need to rest in the pan for 10 minutes. This lets them firm up just enough to handle without falling apart. Then move them to a wire rack to cool completely, which takes at least an hour.
If any warmth remains, the frosting will melt on contact, turning glossy and sliding off. You want the cupcakes at room temperature so the frosting stays put and holds its shape.
The domed top gives you a natural mound to frost, and that curve helps the decorations sit at the right angles. Filling the liners only two-thirds full gives the batter room to rise without overflowing. Once cooled, the surface is set and slightly porous, so the frosting grips instead of gliding.
A fully cooled cupcake also slices cleanly when eaten. Rushing this step undoes the careful work of piping and decorating.
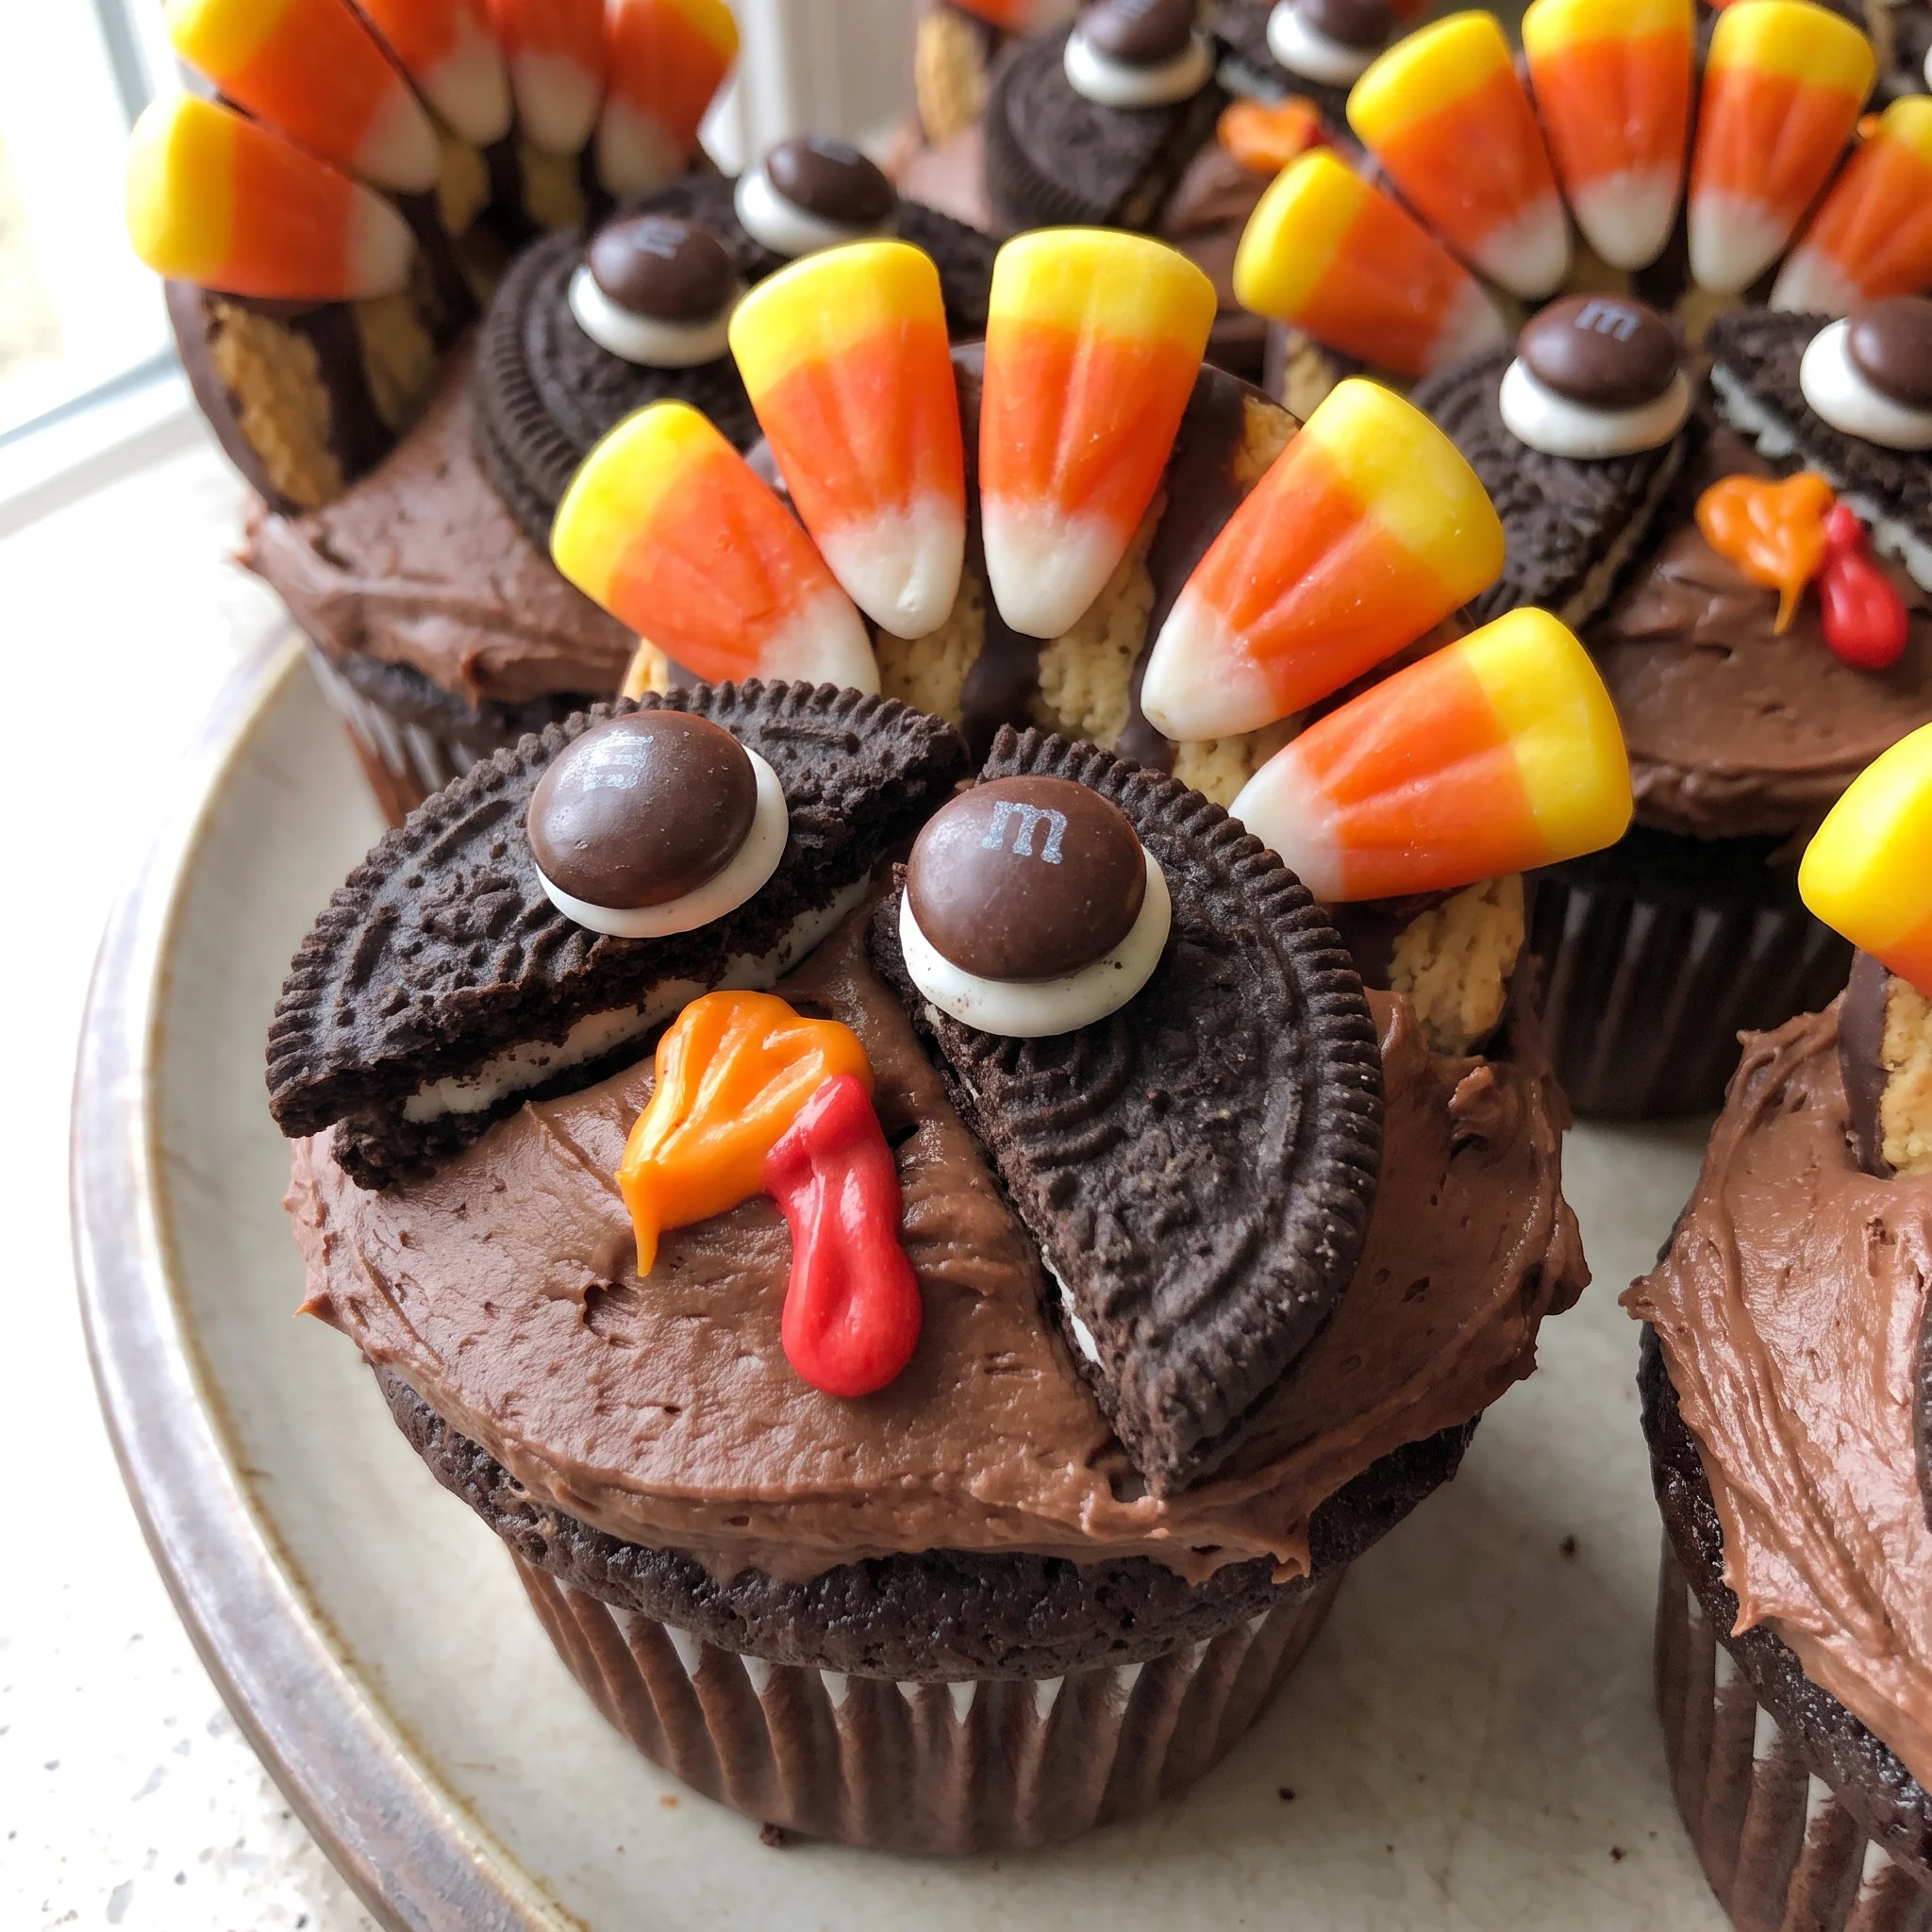
Ingredient notes that keep your turkey cupcakes from flopping
Cocoa powder: Dutch-process cocoa gives a darker color and smoother flavor, but natural cocoa works if you adjust leavening.
Gel food coloring: Gel holds its color without thinning the royal icing, so the red and orange stay sharp on the nose and waddle.
Fudge Stripe Cookies: The striped side faces down, so pick a brand with a firm chocolate coating that won’t flake off when you insert the tail.
Candy corn: Fresh candy corn is soft and pliable, but stale pieces get hard and won’t hold the white tip pointing inward.
Royal icing firms up through two mechanisms: the egg white proteins are beaten until they unfold and cross-link into a foam, and the powdered sugar draws water out of that foam as it dries. If the icing is mixed only briefly, the proteins stay loosely structured and the sugar cannot lock the shape; if the icing is too thin, the candy corn’s weight exceeds the icing’s yield stress and it creeps sideways before setting. The visual cue is a piped line that holds a sharp ridge and does not spread at the edges, if the ridge slumps within a few seconds, the icing is too fluid and no amount of drying time will fix it.
Judging the make-or-break moments
When the batter is fully mixed without going too far
Three minutes on medium speed is the target, but the cue is visual: the batter should be glossy and uniform, with no dry cocoa streaks. Stop there. On a stand mixer, three minutes can be enough to make the batter slightly tight; if it starts to look dull or feels stiff when you lift the beater, you’ve gone past the point.
The cupcakes will still bake, but they’ll be a touch denser. If you’re unsure, scrape the bowl and fold once or twice by hand instead of mixing longer.
Reading doneness before the toothpick comes out clean
The card gives 20 to 25 minutes, but the real test is the dome: it should spring back when you press the center lightly, and the top should look set, not wet or jiggly. A toothpick inserted in the middle should come out with just a few moist crumbs, not wet batter.
If the centers still look shiny at 20 minutes, give them another 2 to 3 minutes and check again. Pulling them early means they’ll sink as they cool and the frosting will have a crater to sit on.
Knowing when the frosting will hold a piped edge
After whipping, the frosting should feel thick enough that a spoon dragged through leaves a clean track, and a small dollop should hold a soft peak without slumping. If it slides off the spoon in a ribbon that disappears in a second, it’s too loose for piping; add powdered sugar a tablespoon at a time. If it feels stiff and tears when you stir, a teaspoon of cream will bring it back.
The difference between a swirl that stays and one that sags is that texture, not the exact amounts.
Testing whether the royal icing pieces have dried enough to move
Wait 30 minutes after gluing the candy corn to the cookie, then touch the icing at the base of the candy corn. It should feel firm and dry, not tacky or soft.
If it’s still sticky, give it more time; moving it too early lets the candy corn slide out of position. The same check applies to the M&M eyes and the piped nose and waddle. A light touch on the top of the waddle tells you if it’s set enough to hold the eyes without smearing.
Judging the tail cookie’s dryness before inserting it
The cookie tail must be fully dry before you push it into the back of the frosted cupcake. Test by lifting the cookie by its edge; the candy corn and icing should stay put with no wobble.
If there’s any give, wait longer. Inserting a still-soft tail means it will crack or droop once it’s in the frosting, and the whole turkey tilts. The frosting on the cupcake also needs to be set enough to grip the cookie; if it’s freshly piped, give it a few minutes to firm up.
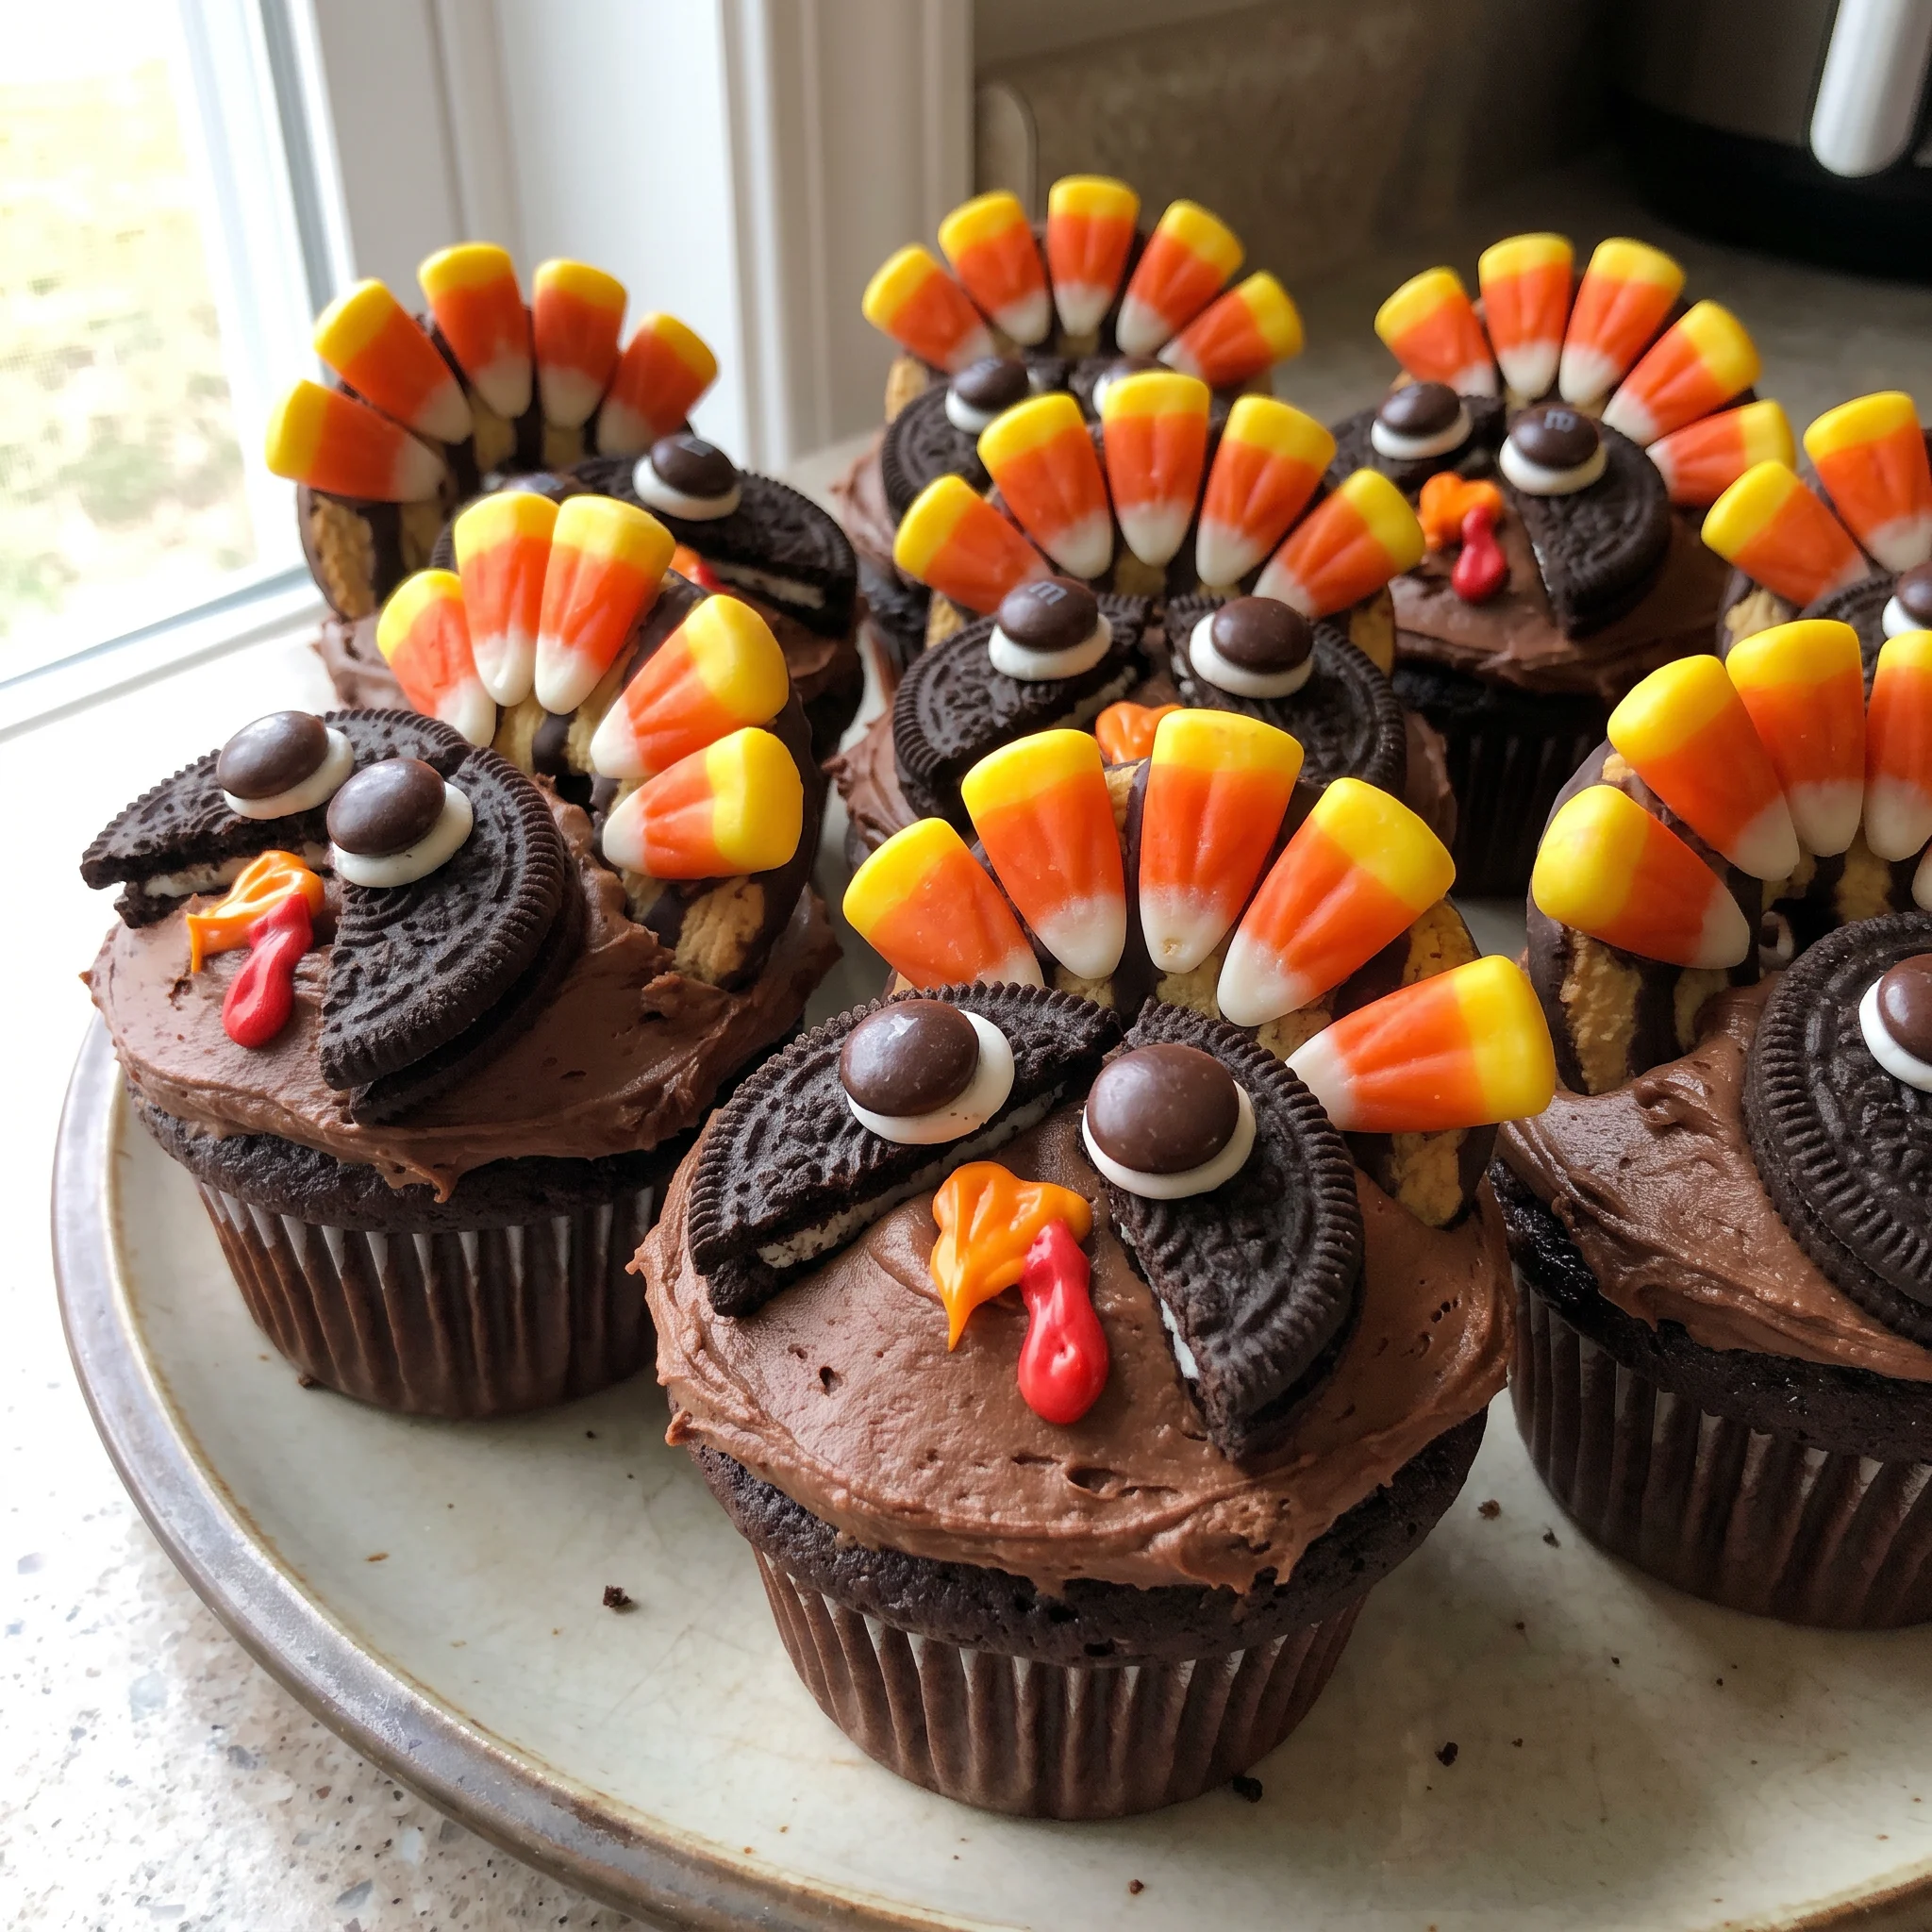
Thanksgiving Turkey Cupcakes with Chocolate Frosting
Ingredients
Method
- Prepare cupcake tins by placing paper liners inside, then heat oven to 350°F (175°C).
- Into a bowl, sift together flour, sugar, cocoa, baking soda, baking powder, and salt.
- In a separate bowl, whisk eggs, whole milk, oil, and vanilla until blended.
- Pour the egg mixture into the dry ingredients and mix on medium speed for 3 minutes until thoroughly incorporated.
- Divide batter among the lined cups, filling each about two-thirds full.
- Place in oven and bake at 350°F (175°C) for 20–25 minutes.
- Take out of oven and let cool in the pan for 10 minutes.
- Move cupcakes onto a wire rack and allow to cool completely, at least 1 hour.
- Whip the softened butter by itself until it reaches a smooth texture.
- Into the creamed butter, add cocoa and powdered sugar alternately with heavy cream, beating until smooth and thick.
- If the mixture is too thick, incorporate additional heavy cream; if too thin, incorporate additional powdered sugar.
- Transfer frosting into a large pastry bag fitted with a large frosting tip.
- Twist the open end of the bag to force frosting down to the tip.
- Apply frosting to cupcakes, beginning at the outer edge and moving inward toward the center.
- In a mixing bowl, combine all icing ingredients except food coloring and beat on medium speed for 4 minutes.
- Should the icing lack sufficient stiffness, incorporate ¼ cup (30 g) powdered sugar.
- Separate icing equally into three bowls.
- Into the first bowl, stir in several drops of orange gel food coloring until evenly blended.
- Into the second bowl, mix in drops of red gel food coloring until well combined.
- Keep the third bowl of icing white.
- Transfer each colored icing into separate frosting bags fitted with #5 tips. Twist the open end to push icing to the tip.
- Use the cupcake picture as a visual reference.
- Place Fudge Stripe cookies with the striped side facing down.
- Set a candy corn piece on the fudge side of the cookie.
- Take off the candy corn and apply white icing as “glue”.
- Position the candy corn with its white tip aimed toward the cookie’s center.
- Let dry for up to 30 minutes, verifying they are dry.
- After drying, insert the cookie into the back of the frosted cupcake to form the “tail”.
- To create turkey eyes, split two Oreo cookies per cupcake, preserving as much filling as possible on one half; throw away the other half.
- With white icing as “glue”, fasten a chocolate M&M (eyeball) onto the Oreo half that has filling.
- Let the eyeball (M&M) dry.
- As the eyeball dries, pipe a dot of orange icing for the nose. Wait 30 seconds for the nose to dry.
- Pipe red icing for the waddle directly beneath the nose. Wait 30 seconds to dry before putting eyes on the cupcake. Test dryness by lightly touching the top of the waddle.
- Place a small dab of white icing on the back of each eye and set it onto the cupcake.
- Use the picture of the finished cupcakes for proper eye placement.
- Let dry a bit longer before moving.
How do you store leftover turkey cupcakes, and when are they best eaten?
Serve these the day you decorate them. The frosting is butter and cream, the royal icing pieces are sugar and egg white, and the cookie tail is crisp only until it sits against that moisture.
By the next day the tail softens and the piped nose and waddle lose their sharp edges, though the cupcakes still eat fine. Keep leftovers in a single layer in a lidded container in the fridge, where the frosting stays firm and safe for about three days. Cold dulls the frosting’s texture, so let a cupcake sit out 20 minutes before serving.
Don’t freeze assembled cupcakes; the dairy frosting and royal icing both break down and the cookies go limp. If you want a head start, freeze the unfrosted cupcakes well wrapped for up to a month, thaw at room temperature, then frost and decorate fresh the day you serve.
Tips
- Set each finished cupcake in a cupcake box with a deep lid or a tall-sided container, not a flat cake carrier. The tail cookie sticks out past the frosting at an angle, and a lid that rests on the dome will press the cookie down, cracking the dried royal icing at its base and tilting the turkey. Leave at least an inch of headroom above the highest tail.
- Move the cupcakes by sliding a hand or a small spatula under each liner rather than lifting them by the tail cookie or the Oreo eyes. The cookie is only anchored in frosting, and the eyes sit on a dab of dried icing, so a grip on either piece pulls it free. Carry them one at a time or on a rimmed tray, and set the tray down flat instead of tilting it to fit into the fridge.
Substitutions that keep the turkey standing, and the ones that topple it
Fudge Stripe Cookies: Any round, firm chocolate-coated shortbread about 2 inches across works. If you can’t find striped ones, a plain chocolate wafer or a chocolate-dipped shortbread round will do.
The cookie is the tail, so it needs to stay rigid when you push it into the frosting and hold the candy corn without drooping. A soft or crumbly cookie will break at the insertion point. A thin wafer might snap under the candy corn’s weight.
If the cookie is much larger than the cupcake’s back, the turkey looks front-heavy; trim if needed. Start with the same quantity the recipe uses (one package) and adjust based on how many cupcakes you’re decorating.
Candy corn: No real substitute gives the same pointed shape and color gradient. You could use a small orange gumdrop, but it won’t have the white tip that points inward. If you must, cut a small triangle from a marshmallow and tint it, but that’s fiddly.
Candy corn is the head. The white tip is the beak, so its orientation matters. Fresh candy corn is soft and sticks well with icing; stale pieces are hard and won’t hold the angle you set.
If using a gumdrop, the head will be rounder and the beak less defined, but it will still read as a turkey. Start with the same amount the recipe calls for (one bag) and adjust to how many you need.
Gel food coloring: Liquid food coloring can be used in a pinch, but you’ll need more drops to get the same intensity, and it will thin the royal icing. Royal icing needs to be stiff enough to pipe a nose and waddle that hold their shape.
Liquid coloring adds water, so the icing may spread or run. If you only have liquid, add it a drop at a time and stop before the icing loses its body. If it gets too loose, stir in a little powdered sugar to bring it back.
The color will still be red and orange, but less vivid. Start with the same amount the recipe uses (a few drops) and adjust after testing a small squeeze on parchment.
Oreo Cookies (for eyes): Any chocolate sandwich cookie with a creamy filling will work. You need the filling to act as a base for the M&M. If you can’t find Oreos, a similar store-brand cookie is fine.
The filling is what holds the M&M in place. If the filling is too soft or thin, the eyeball will slide.
If the cookie is too crumbly, it may break when you split it. Split carefully to keep the filling intact on one half.
You’ll need two cookies per cupcake (one for each eye), so one package is enough. Start with the same quantity the recipe uses and adjust based on how many eyes you’re making.
Frequently Asked Questions
Can I make the turkey decorations ahead of time?
Yes, you can make the decorations ahead, but they need to be stored so they stay firm. Once the royal icing pieces are fully dry, they hold their shape and can be set aside.
The article’s storage section says assembled cupcakes are best the day they’re decorated, so if you’re making the decorations ahead, keep them in a single layer in a lidded container at room temperature and use them within a day or two. The candy corn and M&M eyes are the most fragile; if they’re glued with icing, let that icing dry completely before stacking or moving them. For a head start, you can also freeze the unfrosted cupcakes well wrapped for up to a month, then thaw and decorate fresh the day you serve.
Just don’t freeze the assembled cupcakes.
Why are my royal icing decorations not drying?
The most likely cause is that the icing was too thin, so it stays tacky instead of setting firm. When you pipe a dot, it should hold a bead that doesn’t flatten out. If it spreads or feels soft after 30 minutes, the icing needs more powdered sugar.
Another possibility is that you’re working in a humid kitchen; royal icing absorbs moisture from the air and can stay sticky. Try moving the pieces to a drier spot.
Also, make sure you’re using gel food coloring, not liquid, because liquid adds water and can prevent proper drying. If the icing is still tacky after an hour, give it more time; sometimes it just needs longer.
How do I keep the candy corn from sliding off the cookie?
The trick is to use enough icing as glue and let it dry completely before you move the cookie. When you set the candy corn, press it gently into the icing so it makes contact, but don’t push so hard that the icing squishes out.
The white tip should point toward the cookie’s center. After you glue it, wait at least 30 minutes and then test by touching the icing at the base; it should feel firm and dry, not tacky.
If it’s still soft, give it more time. Also, make sure the cookie’s fudge side is clean and not oily; a greasy surface can keep the icing from sticking. Fresh candy corn works better than stale, which can be hard and not hold the angle.
Can I use a different frosting for these cupcakes?
You can, but the frosting needs to be thick enough to hold a piped swirl and support the cookie tail. The recipe’s cocoa frosting is designed to be spreadable yet stable, so if you swap it, pick something with a similar body, like a sturdy buttercream.
A whipped cream or glaze frosting would be too soft and the tail would droop. Also, keep in mind that the decorations are glued with royal icing, which sets hard; if your frosting is very soft, the eyes and nose might slide. If you do use a different frosting, pipe it on thickly to create a firm base.
The article’s substitutions section doesn’t cover frosting swaps, so you’re on your own there, but the principle is to match the texture.
